
As a motocross photographer, I often get questions about my editing process. Today, I’ll share my workflow for editing and color-correcting motocross images using Adobe Lightroom and Photoshop. This process helps me achieve vibrant, dynamic, and professional-looking photos that capture the intensity of motocross racing. In this article, I will show you Step-by-Step Workflow Editing and Color-Correcting Motocross Images in Lightroom and Photoshop how I do.
As a motocross photographer, I often receive questions about my editing process. Today, I’ll share my comprehensive workflow for editing and color-correcting motocross images using Adobe Lightroom and Photoshop. This process helps me achieve vibrant, dynamic, and professional-looking photos that capture the intensity of motocross racing.
Step-by-Step Workflow Editing and Color-Correcting Motocross Images in Lightroom and Photoshop
1. Denoise in Lightroom
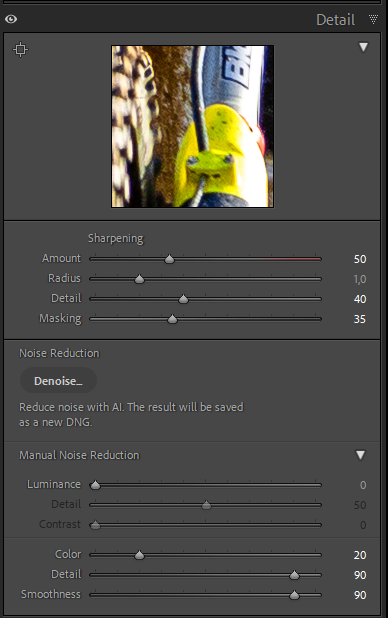
The first step in my editing process is to reduce noise in Lightroom. Motocross events often take place in varying light conditions, which can introduce noise into your images. To denoise:
- Import your image into Lightroom : Start by importing your RAW or JPEG files into Lightroom.
- Go to the Detail panel : In the Develop module, navigate to the Detail panel.
- Adjust the Luminance slider : Increase the Luminance value to reduce noise. Be careful not to overdo it, as this can soften the image.
- Use the Color slider : Adjust the Color slider to reduce color noise, which often appears as speckles of color in dark areas.
- Fine-tune with Detail and Contrast sliders : Use these sliders to balance the noise reduction while retaining image sharpness.
2. Fix Exposure and Contrast in Lightroom
Next, I adjust the exposure and contrast to ensure the image is well-balanced.
- Basic panel adjustments : In the Basic panel, use the Exposure slider to brighten or darken the image.
- Contrast slider : Increase the contrast to add depth and make the subject stand out.
- Highlights and Shadows : Use the Highlights slider to recover details in bright areas and the Shadows slider to bring out details in dark areas.
- Whites and Blacks : Adjust these sliders to set the white and black points in the image, ensuring a full range of tones.
3. Color Correct in Lightroom
Color correction is crucial for making your motocross images pop. I use LUTs (Lookup Tables) to get a good starting point and then make further adjustments.
- Apply a LUT : Go to the Profile dropdown in the Basic panel and select a profile that suits your image. LUTs can quickly apply a specific look or style to your photo.
- White Balance tool : Use the White Balance eyedropper to click on a neutral gray area in the image, setting the correct white balance.
- Temperature and Tint sliders : Fine-tune the Temperature slider to adjust the overall warmth or coolness of the image. Use the Tint slider to correct any green or magenta color casts.
- HSL/Color panel : Use this panel to adjust specific colors. For example, boost the saturation of the rider’s jersey or the vibrancy of the track to make them stand out.
4. Edit in Photoshop
For more advanced edits, such as removing distractions or enhancing specific areas, I switch to Photoshop.
- Open in Photoshop : Right-click on the image in Lightroom and select Edit In > Edit in Adobe Photoshop .
- Clone Stamp Tool : Use this tool to remove unwanted elements like distracting background objects or blemishes.
- Content-Aware Fill : This tool can intelligently fill in areas where you’ve removed objects, blending seamlessly with the surrounding pixels.
- Healing Brush Tool : Use this tool to smooth out any imperfections or minor distractions in the image.
5. Fine-tune Colors in Photoshop
Sometimes, I make final color adjustments in Photoshop to add that extra touch.
- Adjustment Layers : Use layers like Curves, Levels, or Selective Color to fine-tune the colors without affecting the original image.
- Color Lookup adjustments : Apply Color Lookup adjustments to enhance the overall look of the image, similar to using LUTs in Lightroom.
- Layer Masks : Use masks to apply adjustments selectively to specific areas of the image, giving you precise control over the final look.
Tips for Motocross Photography
- Shoot in RAW : This format captures all the data from the camera sensor, giving you more flexibility in post-processing.
- Use Fast Shutter Speeds : To freeze the action and capture sharp images, use shutter speeds of 1/1000 second or faster.
- Experiment with Angles : Shoot from different angles, including low to the ground or from elevated positions, to add variety to your portfolio.
- Backup Your Work : Always keep backups of your original and edited files to prevent data loss.
- Practice : The more you shoot and edit, the better you’ll get at capturing and enhancing motocross action.
Here can you see some of my edited photos:
Motocross Photos from Gnagaredalen
High-Resolution Motocross Photo Bundle – Västervik Track September 2024
Conclusion
Editing and color-correcting motocross images in Lightroom and Photoshop can significantly enhance the quality of your photos. By following this workflow, you can achieve professional-looking images that capture the excitement and intensity of motocross racing. Happy editing!
Responses
Hej
Låter ju intressant, fotar själv en del motorsport. Skulle du kunna göra en video där du visar och förklarar? Tycker din stil är riktigt bra 👍
Hej Sten
Tackar för den kommentaren.
Jag har funderat på att göra videor, men det är ganska tidskrävande. Just nu försöker jag bli bättre på att filma cross och andra snabba sporter. Det kan kanske bli när den här sidan är klar.